3mm to 10mm Horizontal Bone Augmentation for Dental Implants: Case #6 — Safecut Technique, Implant Placed in 4 Months
A jaw ridge measuring just 3 mm. A dental implant requiring at least 7 mm. And an implant now fully placed in bone that didn’t exist four months ago.
This is Case #6 in Dr. Cvetan Mechev’s large volume bone augmentation for dental implants series at La Mesa Dental Center. It is one of the most dramatic transformations in the series — 7 mm of horizontal bone gain achieved using the computer-guided Safecut technique and 100% autogenous bone, followed by implant placement in the newly rebuilt jaw.
The Problem: 3 mm Is Not Enough
When this patient first came to La Mesa Dental Center, CBCT imaging confirmed the jaw ridge at the implant site measured just 3 mm. A standard dental implant requires a minimum of 7 mm of bone width to be fully encased in bone on all sides.
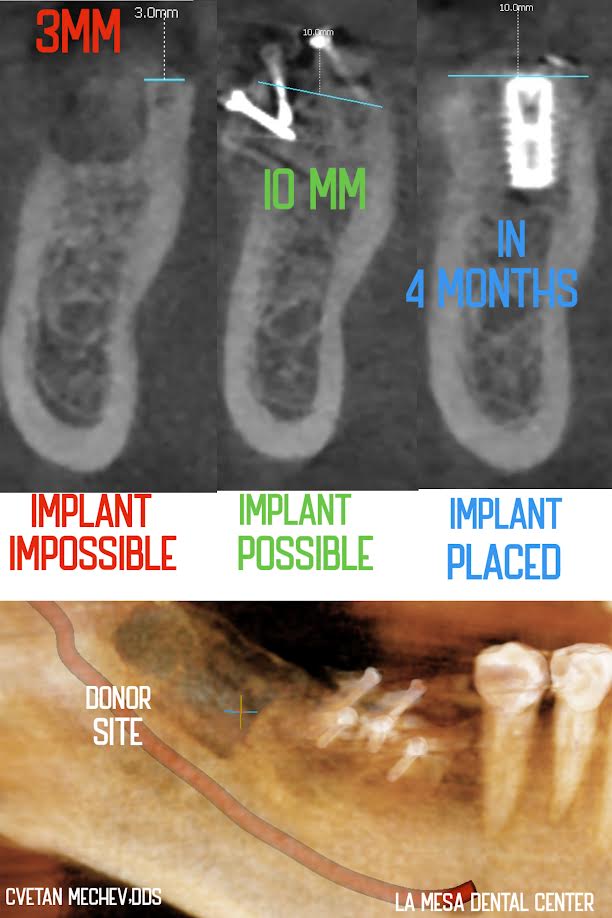
At 3 mm, the implant body would have been exposed on both sides of the ridge — a guaranteed path to bacterial infiltration, bone loss around the implant, and early failure. The first CBCT panel makes the situation clear: Implant Impossible.
Without bone augmentation, no responsible clinician would place an implant here.
What the CBCT Images Show: Three Stages, One Story
The case documentation captures the full treatment arc across three CBCT panels. Specifically, each panel tells a distinct part of the story.
- 3 mm — BEFORE augmentation — Dr. Mechev confirmed a critical ridge deficiency in the posterior mandible. At this width, implant placement was not possible.
- 10 mm — AFTER augmentation — the rebuilt ridge width reached 10 mm. As a result, implant placement became possible.
- 10 mm — IN 4 MONTHS — AFTER implant placement — Dr. Mechev placed the implant fully into the new bone. Two independent measurements of 10 mm confirmed the width on both sides.
In addition, the lower panel shows the donor site — the area of the patient’s own jaw where Dr. Mechev harvested the autogenous bone. The 3D CBCT panoramic view confirms both sites within the same jaw.
The Technique: Computer-Guided Safecut with 100% Autogenous Bone
Case #6 stands apart from many augmentation cases in this series. The key difference is the use of the Safecut technique — a computer-guided surgical protocol developed by Dr. Luca De Stavola in Padua, Italy.
Dr. Mechev is the only dentist in San Diego and California who trained twice in Padua directly under Dr. De Stavola. Through that training, he reached the highest level of Safecut certification: Computer Guided Autogenous Bone Harvesting for Dental Implants Bone Grafting Vertical and Horizontal Augmentation. This credential brings a level of precision and predictability to autogenous bone harvesting that conventional surgical approaches simply cannot match.
Here is how the procedure unfolded in this case:
- First, Dr. Mechev used CBCT imaging to map the donor site precisely before any surgery began.
- Next, he harvested bone from the area behind the patient’s lower molars using the Safecut computer-guided protocol. This approach minimized trauma to surrounding tissue.
- He then shaped the harvested bone and secured it at the deficient recipient site using fixation screws.
- Finally, after 4 months of healing, CBCT imaging confirmed the rebuilt ridge at 10 mm — ready for implant placement.
In short, no synthetic filler, no donor tissue. Instead, Dr. Mechev used 100% the patient’s own bone, guided by the most advanced computer-directed harvesting technique available.
Why This Case Is Different: The Implant Is Already In
Most bone grafting case documentation stops at the rebuild stage. However, Case #6 — like Case #7 and Case #8 in this series — goes further: the implant is already placed and seated in the new bone.
Specifically, the third CBCT panel shows the implant fully integrated into the 10 mm ridge. Two independent measurement lines, each reading 10.0 mm, confirm the bone width on both sides of the implant. This is not a projection or a plan. It is a completed case — with the implant sitting in bone that did not exist four months earlier.
Why the Safecut Technique Matters for Large-Volume Cases
To appreciate why the Safecut technique matters here, consider the scale of this case. A 7 mm bone gain — the difference between 3 mm and 10 mm — sits at the upper end of what horizontal bone augmentation can reliably achieve. Cases of this magnitude require more than technical skill. In addition, they require a surgical protocol that:
- Precisely maps the donor site before any incision, using CBCT data, to avoid nerve structures and maximize harvest volume
- Minimizes trauma at the donor site so that healing runs concurrently with recipient site integration
- Stabilizes the graft block in three dimensions throughout the 4-month healing window
The Safecut protocol meets all three demands. Because of this, Dr. Mechev can confidently execute cases at this level. In fact, most dentists in Southern California — and most dentists in California — would refer cases of this complexity to an oral surgeon or periodontist.
Why 100% Autogenous Bone Gives the Most Predictable Results
To understand why autogenous bone works best, consider the alternatives. Several bone graft materials exist in implant dentistry. These include synthetic substitutes, freeze-dried donor bone (allograft), animal-derived materials (xenograft), and autogenous bone. Each has its place. However, for cases where the ridge needs significant rebuilding, autogenous bone delivers the most predictable outcome. Here is why:
- It carries the patient’s own living bone cells — so there is no rejection risk
- It actively generates new bone, rather than just providing a scaffold for other tissue
- It integrates faster and more densely than synthetic alternatives
- On imaging, the resulting bone is indistinguishable from the patient’s native jaw bone
Furthermore, the fixation screws hold the graft block precisely in position throughout the healing period. This stability is critical — even slight movement during healing can disrupt the integration process.
Horizontal vs. Vertical Bone Augmentation
This case addresses horizontal bone loss. In other words, the ridge was too narrow, not too short.
Horizontal augmentation rebuilds the width of the jaw ridge. This determines whether an implant can sit fully enclosed in bone from front to back.
Vertical augmentation, on the other hand, rebuilds the height of the jaw ridge. This determines how deep an implant can be seated.
In Case #6, the deficit was entirely horizontal — 3 mm where 7 mm was the minimum needed. The final result reached 10 mm. For a vertical augmentation case, see Case #9 — a 6 mm vertical gain using the Safecut technique. For additional horizontal cases, see Case #10 (5 mm horizontal augmentation) and Case #8 (2.5 mm to 7 mm horizontal rebuild).
Who Needs Horizontal Bone Augmentation Before an Implant?
Horizontal ridge loss is one of the most common reasons dentists tell patients they cannot have an implant. The bone begins to shrink almost immediately after a tooth is lost. Without the stimulation of a tooth root, it narrows steadily over months and years.
Specifically, you may be a candidate for horizontal bone augmentation if:
- A dentist told you your jaw is “too thin” for an implant
- You lost a tooth years ago and never replaced it
- Previous infection, trauma, or a failed implant caused localized bone loss
- A CBCT scan shows a ridge width below 7 mm at the planned implant site
Many patients hear that implants are not possible because of bone loss. However, in a large proportion of those cases, bone augmentation makes implant placement not just possible — but predictable.
Dr. Mechev’s Approach: All In-House, Start to Finish
Every augmentation case at La Mesa Dental Center begins with a CBCT scan. This full 3D map of the jaw reveals bone dimensions at every point along the ridge. As a result, Dr. Mechev can plan the entire Safecut surgical approach before the patient enters the surgical chair.
Dr. Cvetan Mechev, DDS has practiced dentistry for 26 years. He pursued advanced bone grafting training internationally in Dubai (UAE), London (UK), Padua (Italy), and Budapest (Hungary). He is the only dentist in San Diego and California who trained twice in Padua under Dr. Luca De Stavola, learning the Safecut method — a computer-guided way to harvest bone from one part of the jaw and use it to rebuild another area before placing an implant. This training covers both widening a thin jaw (horizontal grafting) and building up a short jaw (vertical grafting).
Moreover, he performs the full scope of ridge augmentation and implant procedures in-house at La Mesa Dental Center. From CBCT planning through bone augmentation, healing, implant placement, and final crown — one doctor manages the entire process. No referrals. No coordinating between multiple offices. Patients travel to La Mesa Dental Center from across California, Arizona, and Nevada specifically for Dr. Mechev’s bone augmentation expertise — a procedure most dentists in the region refer out entirely.
- Horizontal bone ridge augmentation
- Vertical bone ridge augmentation
- Bone graft for dental implants
- Guided tissue and bone regeneration
- Sinus lift for dental implants
- Dental implants
Serving San Diego, La Mesa, El Cajon, Spring Valley, and Southern California
La Mesa Dental Center is located at 8334 University Ave, La Mesa, CA 91942. The practice serves patients throughout La Mesa, El Cajon, Spring Valley, Lemon Grove, San Diego, and Southern California.
If a dentist has told you that you don’t have enough bone for an implant, a CBCT scan and consultation with Dr. Mechev will show you what is actually possible.
Call (619) 337-2424 or request an appointment online.
Frequently Asked Questions
What is the Safecut technique?
Safecut is a computer-guided surgical protocol for autogenous bone harvesting. Dr. Luca De Stavola developed it in Padua, Italy. It uses CBCT imaging to map the donor site precisely before surgery. As a result, it minimizes tissue trauma and maximizes graft volume. Dr. Mechev is the only dentist in San Diego and California trained at its highest level.
How much bone gain is possible with horizontal augmentation?
It depends on the case. For example, in Case #6, Dr. Mechev achieved 7 mm of horizontal gain — from 3 mm to 10 mm — using the Safecut technique and 100% autogenous bone. Results vary based on the patient’s anatomy and the surgical approach used.
How long does healing take before the implant is placed?
Dr. Mechev’s standard healing window is 4 months. After that, CBCT imaging confirms whether the bone is mature and ready. Only then does he proceed with implant placement.
Where does the donor bone come from?
Dr. Mechev harvests autogenous bone from the patient’s own jaw — typically the area behind the lower molars. He uses the Safecut computer-guided protocol to plan the harvest precisely. Because of this, trauma at the donor site stays minimal.
Can I get an implant if I’ve been told I have too little bone?
In many cases, yes. Horizontal bone augmentation can rebuild ridge width that was previously too narrow. A CBCT scan and consultation with Dr. Mechev will determine what is possible for your specific situation.
Do you treat patients traveling from Arizona or Nevada for bone augmentation?
Yes. Patients regularly travel to La Mesa Dental Center from Arizona, Nevada, and across Southern California for bone augmentation procedures that are not widely available closer to home. The Safecut technique and 100% autogenous bone approach Dr. Mechev uses requires advanced international training that most dentists in the region — and most dentists in the Southwest — do not have. If you are planning to travel for treatment, call (619) 337-2424 to discuss your case and schedule a consultation before your procedure date.